Introduction
Building a wine cellar in your basement is not just about having a cool storage space; it’s about creating a sanctuary for your wine collection. Whether you’re a passionate wine enthusiast or an occasional sipper, understanding wine cellar construction will ensure your collection ages gracefully and stays in optimal condition.
Quick Steps to Start Building A Wine Cellar:
1. Choose the right location in your basement.
2. Check for leaks to ensure proper sealing.
3. Frame and insulate walls and ceiling.
4. Install a dedicated cooling system.
5. Select and install wine racks that fit your style.
Building a wine cellar adds sophistication and functionality to your home. Properly stored wine not only tastes better but can also increase in value. It creates an elegant entertainment setting and offers a unique way to showcase your collection. Moreover, a well-designed wine cellar can significantly boost your home’s market value, making it a worthwhile investment.
For more details, let’s explore each step thoroughly. But if you’re eager to get started, here’s a quick infographic summarizing the main points.
Planning Your Wine Cellar Construction
Location
Choosing the right location for building a wine cellar is crucial. Ideally, you want a space that is cool, dry, and free from natural light and vibrations. Basements are a popular choice because they naturally have these conditions. However, you can also consider other areas in your home like closets, under the stairs, or even a dedicated room.
The key is to find a spot where you can maintain a consistent temperature of 55°F–58°F and humidity levels between 55%–75%.
“A small wine cellar cooling unit and the lower the overall cost, the closer you go to the 55°F–58°F temperature and 55%–75% percent humidity that your wine requires.”
Size
The size of your wine cellar depends on your current wine collection and how much you plan to expand it. A modest-sized space of just 25 square feet can store up to 500 bottles. If you have a larger collection or plan to grow it, you may need a bigger space.
Consider these factors when determining the size:
– Available space in your home
– Amount of wine you want to store
– Any additional activities (like tasting or entertaining)
– Your budget
“Not all wine cellars need to be large. In fact, a little goes a long way.”
Budget
Budget is a critical factor in planning your wine cellar construction. Costs can range from a few thousand dollars for a small, DIY project to upwards of $100,000 for a luxurious, professionally built cellar.
Here’s a quick breakdown of potential costs:
– Basic: $3,000–$10,000
– Mid-Range: $10,000–$30,000
– High-End: $30,000–$100,000+
It’s essential to invest in high-quality materials that are durable and resistant to humidity. Cutting corners can lead to costly repairs and potentially ruin your wine collection.
“A home wine cellar can be built for as little as a few thousand dollars and can cost upward of $100,000 if you want something top of the line.”
Planning your wine cellar carefully ensures that you create a space that meets your needs and fits your budget. Now, let’s move on to the essential steps on wine cellar construction.
Essential Steps on Building a Wine Cellar
Wine cellar construction might seem daunting, but breaking it down into manageable steps makes it easier. Here are the essential steps to guide you through the process.
Permit
Before you get started, find out if you need a building permit. This varies by location, so check with your local building office. Getting the right permits is crucial. It ensures your project complies with local, state, and national building codes. Skipping this step can lead to legal issues and might even void your homeowner’s insurance.
Design
Designing your wine cellar is one of the most exciting parts. Think about how you want to use the space. Will it be purely for storage, or do you also want an area to entertain guests?
Key Design Considerations:
– Aesthetics vs. Functionality: Decide if you want to showcase your collection or maximize storage capacity.
– Space Utilization: Small spaces like closets or areas under stairs can be converted into wine cellars. For larger collections, consider using a basement or a dedicated room.
– Style: Choose between traditional or modern designs. High-end materials like marble and mahogany offer durability and elegance but come at a higher cost.
Space Assessment
Before diving into construction, assess the space thoroughly. This step ensures that your wine cellar will function as intended and won’t encounter issues down the line.
Steps to Assess the Space:
1. Check for Leaks: Inspect for air, light, or water leaks. A tightly sealed space is essential for maintaining the right conditions for wine storage.
2. Structural Integrity: Consult a structural engineer to ensure the foundation and supporting structures are in good condition. Address any issues like water damage or cracks.
3. Insulation: Ensure the walls have at least R-19 insulation and the ceiling R-30. Proper insulation helps maintain the ideal temperature and humidity levels.
4. Moisture Control: Basements are prone to moisture issues. Implement waterproofing solutions like sealing cracks and applying waterproof coatings to walls and floors.

“Basements are often recommended for wine cellars as they are cooler and more humid than the rest of the house.”
By thoroughly planning and assessing your space, you’ll set a solid foundation for building a wine cellar that meets your needs and stands the test of time.
Next, we’ll dive into choosing the right location in your basement to optimize your wine storage conditions.
Choosing the Right Location in Your Basement
Selecting the perfect spot for building a wine cellar in the basement is crucial. The right location ensures your wine ages gracefully and stays in top condition. Here are three key factors to consider:
Outside Wall
Positioning your wine cellar construction against an outside wall is often recommended. This location typically maintains a more consistent temperature, which is vital for wine storage. Basements naturally stay cooler than the rest of the house, but an outside wall can further stabilize the environment. This helps in reducing the load on your cooling system, saving energy and costs in the long run.
Vibration
Vibration can disturb the aging process of wine. It’s essential to choose a spot away from sources of vibration. For example, avoid areas near the laundry room, furnace, or places with heavy foot traffic. Even minor vibrations can affect the sediment in the wine, potentially altering its flavor.
One homeowner shared, “I initially placed my wine cellar near the laundry room, but the constant vibrations from the dryer affected my wine collection. Moving it to a quieter part of the basement made a significant difference.”
Light Exposure
Wine should be stored in the dark. Light, especially UV light, can degrade wine, affecting its taste and aroma. Basements are generally low-light areas, but it’s still important to avoid any exposure to natural light. Consider using UV-protected lighting and keep the cellar away from windows or any other sources of natural light.
“Proper lighting is essential. We recommend using LED lights, which emit minimal heat and no UV rays,” says a wine cellar expert.
By carefully selecting the right location in your basement, you’ll create an ideal environment for your wine collection. This ensures that your wine ages well and maintains its quality.
Next, we’ll discuss the essential steps for building a wine cellar, including framing, insulation, and vapor barriers.
Building a Wine Cellar
Insulation and Vapor Barriers
When building a wine cellar, insulation is critical. Think of your wine cellar as a walk-in refrigerator. Insulation helps maintain the ideal temperature and humidity. Use 2×4 or 2×6 studs for framing walls, and at least 2×8 for the ceiling, all spaced 16 inches on center. The more room for insulation, the better. Aim for R-19 insulation in the walls and R-30 in the ceiling. Higher R-values mean better insulation.
Install a vapor barrier to prevent moisture transfer. A 6mm plastic barrier works well. This barrier goes on the “warm side” of your wall to stop warm air from entering and causing condensation. Moisture control is vital to prevent mold and mildew.
Climate Control Systems
The heart of your wine cellar is the climate control system. Wine needs a stable environment with a constant temperature between 45-65°F and humidity levels between 50-70%.
Choose a cooling unit that fits your space. If you can’t vent through a wall, consider a ductless split system. These systems have an indoor evaporator and an outdoor condenser. Ensure proper ventilation to manage condensation. A floor drain or condensate pump is necessary to remove excess water.
Lighting and Electrical Considerations
Proper lighting enhances the cellar’s ambiance without affecting the wine. LED lights are ideal because they emit minimal heat and no UV rays, which can damage wine.
Consider using motion sensors to minimize light exposure. This way, the lights turn on only when someone is in the cellar. Also, plan your electrical outlets carefully. Ensure you have enough outlets for the cooling unit and any additional features like a wet bar.
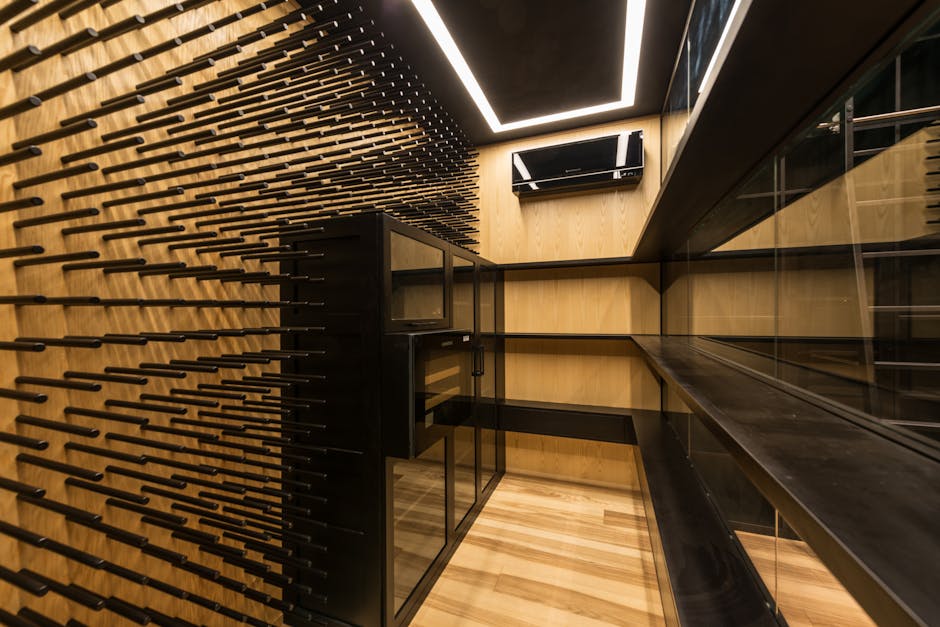
Wine Racks and Storage Solutions
The right wine racks not only store your bottles but also add to the cellar’s aesthetic. Choose racks that allow bottles to lie horizontally, keeping the cork moist.
Materials vary from wood to metal. Wood offers a classic look, while metal provides a modern feel. Consider modular racking systems if you plan to expand your collection. These systems allow you to optimize space and grow your storage capacity.
For a small space, look into wall-mounted racks. They save floor space and can add a decorative element. Ensure your racks are sturdy and can handle the weight of your collection.
By following these steps for wine cellar construction, you’ll create a space that’s both functional and beautiful. Next, we’ll explore the finishing touches that add aesthetic appeal and functionality to your wine cellar.
Finishing Touches for Aesthetic and Functionality
Now that your wine cellar is structurally sound, it’s time to add those finishing touches that make it both beautiful and functional. Let’s dive into the key areas: wall finish, flooring, and door selection.
Seal and Protect Your Wine Cellar Floor
Concrete Sealing: Concrete is a porous material, which means it can absorb moisture. To prevent this, you should seal your concrete floor with a high-quality concrete sealer. This will protect your wine cellar from moisture damage and make it easier to clean.
Flooring Options: Choose a flooring material that can withstand potential spills and high humidity. Popular choices include:
- Sealed hardwood: Adds warmth and elegance.
- Tile or stone: Durable and easy to clean.
- Sealed concrete: Minimalistic and functional.
- Wine barrel flooring: Unique and visually appealing.
Avoid carpet at all costs. It can harbor mold and mildew in the humid environment of a wine cellar.
Selecting the Perfect Door
Insulation: A well-insulated door is crucial for maintaining the temperature and humidity levels in your wine cellar. Use an exterior-grade door that is at least 1¾ inches thick. This ensures that your cooling system doesn’t have to work overtime.
Glass Options: If you prefer a glass door, opt for double or triple-paned tempered glass. This provides better insulation and durability. Glass doors can add an elegant touch, allowing you to showcase your collection while maintaining the right conditions inside.
Sealing: Proper sealing is essential to prevent air leaks. Apply weatherstripping around the door frame and use a proper threshold. You should feel air resistance when closing the door, indicating a good seal. Hollow core interior doors are inadequate for this purpose.
Wall Finish
Water-Resistant Drywall: Use green board drywall, which is resistant to high humidity. This is the same type often used in bathrooms and kitchens.
Decorative Options: Once the drywall is up, you can finish the walls with materials that suit your taste and the overall aesthetic of your wine cellar. Some options include:
- Faux rock or real rock: Adds a rustic charm.
- Brick or tile: Durable and classic.
- Wood paneling: Creates a warm, inviting atmosphere.
- Stucco: Offers a textured, old-world feel.
Lighting and Electrical Considerations
LED Lighting: To protect your wine from UV rays, use LED lighting. It’s energy-efficient and emits minimal heat.
Motion Sensors: Install motion sensors or timers to ensure lights are not left on accidentally. This helps maintain the ideal conditions for your wine.
Avoid Fluorescent Lights: These emit UV rays that can cause wine to age prematurely.
By paying attention to these finishing touches, you’ll create a wine cellar that’s not only functional but also a beautiful space to showcase your collection. Next, we’ll discuss how Berriz Design Build can elevate your wine cellar construction project to new heights.
Berriz Design Build: Elevating Your Wine Cellar Construction Project
Creating a wine cellar is more than just a storage solution—it’s an opportunity to add luxury, class, and timeless beauty to your home. At Berriz Design Build, we specialize in transforming your vision into a stunning reality.
Luxury
Imagine walking into a space that feels like an exclusive wine vault. Berriz Design Build uses high-end materials like marble, bespoke wooden cabinetry, and custom lighting to create an opulent atmosphere. Our commitment to luxury ensures that your wine cellar isn’t just functional but also a place of elegance.
Case Study: One of our clients wanted a wine cellar that mirrored the grandeur of European chateaux. We incorporated Grand Mahogany and Knotty Alder woods, giving the space a rich, timeless feel. The result? A cellar that not only stores wine but also serves as a luxurious retreat.
Class
Class is in the details. From the choice of flooring to the type of door, every element is carefully selected to create a sophisticated space. For instance, we recommend double or triple-paned glass doors with tempered glass to combine functionality with elegance. These doors not only insulate well but also add a touch of class to your cellar.
Quote from a satisfied client: “The attention to detail in my wine cellar is astounding. Berriz Design Build turned my basement into a classy, elegant space that I love showing off to my friends.”
Timeless Beauty
Timeless beauty means your wine cellar will look stunning for years to come. We focus on designs that are not just trendy but classic. This includes using sustainable, FSC-certified woods and water-based finishes that are both eco-friendly and enduring.
Fact: Proper insulation and vapor barriers are crucial for maintaining the longevity of your wine cellar. We use R-19 insulation for walls and R-30 for ceilings, ensuring your cellar remains a controlled environment, preserving both your wine and the beauty of the space.
Why Choose Berriz Design Build?
- Expertise: Our team has years of experience in creating custom wine cellars.
- Quality Materials: We use only the finest materials to ensure durability and beauty.
- Customer Satisfaction: Our clients’ happiness is our top priority. We work closely with you to bring your vision to life.
Elevate your wine cellar project with Berriz Design Build. Whether you’re looking for luxury, class, or timeless beauty, we have the expertise to make it happen. Ready to get started? Contact us today to transform your basement into the wine cellar of your dreams.
Conclusion
Construction of a wine cellar in your basement is a rewarding project that enhances both your home and your enjoyment of wine.
Recap
Let’s recap the essential steps on wine cellar construction:
- Planning: Identify the best location, decide on the size, and set a budget.
- Construction: Frame your cellar, insulate properly, and install a vapor barrier to control moisture.
- Climate Control: Choose a reliable cooling system to maintain optimal temperature and humidity.
- Lighting: Use LED lights and motion sensors to protect your wine from UV exposure.
- Storage Solutions: Install quality wine racks that keep bottles on their sides, ensuring the corks stay moist.
- Finishing Touches: Select durable flooring, and choose a well-sealed, insulated door to complete the look and function of your cellar.
Enjoyment
A well-constructed wine cellar not only preserves your collection but also creates a space for you to enjoy and share your passion with others. Imagine hosting wine tastings with friends or simply enjoying a quiet evening surrounded by your favorite vintages.
Berriz Design Build
At Berriz Design Build, we specialize in creating custom wine cellars that combine functionality with elegance. Our commitment to quality ensures that your wine cellar will be a timeless addition to your home.
Ready to start your wine cellar construction? Contact us today to transform your basement into a beautiful and functional wine cellar that you’ll cherish for years to come.